RFI Origination Quick Reference Guide
RFI Origination Quick Reference Guide
Contractors and subcontractors have the ability to enter RFIs into the Newforma ConstructEx web-based platform in order to submit the documentation to the design team members.
Click here to download a PDF of the reference guide.
To create an RFI, follow the steps below:
Arrive at the RFIs Module
Log into ConstructEx to access the All Projects page.
The first time you log in you will be prompted to complete your profile information. Once your profile is complete you are directed to the All Projects page.
Select the desired project by clicking the project name.
Expand the Construction Administration dropdown menu at the top of the page and select RFIs to open the RFIs module:
Add an RFI
Select Add RFI in the top right corner of the RFIs module page:
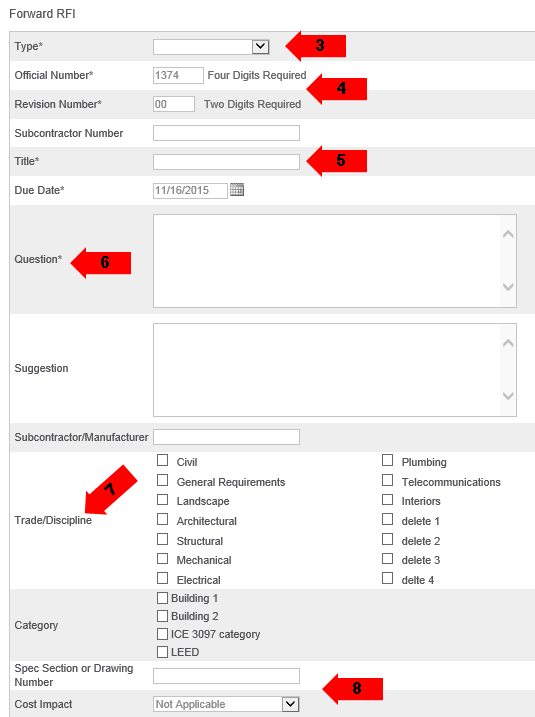
Fill out the information on the Forward RFI page as indicated below:
If the project has RFI Types, select the type from the dropdown. The Type field is only visible when the project includes RFI types.
The RFI type has no effect on the RFI number.
The system automatically generates the Official Number and Revision Number. General Contractors can edit these values if needed. Subcontractors can enter their internal RFI tracking numbers in the Subcontractor Number field.
Enter a Title. Best practice is to enter a descriptive title to help the project team understand what issue the RFI addresses. As an example, the title "North Apron Width" is more helpful in understanding the issue than "Concrete".
The default value for Due Date is configured by an administrator.
Enter the RFI Question. If you have a suggestion, enter it in the Suggestion field. Enter your Subcontractor/Manufacturer information as needed.
Select the Trades/Disciplines that need to review the RFI. If present, select the Category(s). Categories are generally used for different phase or structures within a larger project.
Enter the Spec Section or Drawing Number in question. Select the appropriate Cost Impact as needed.

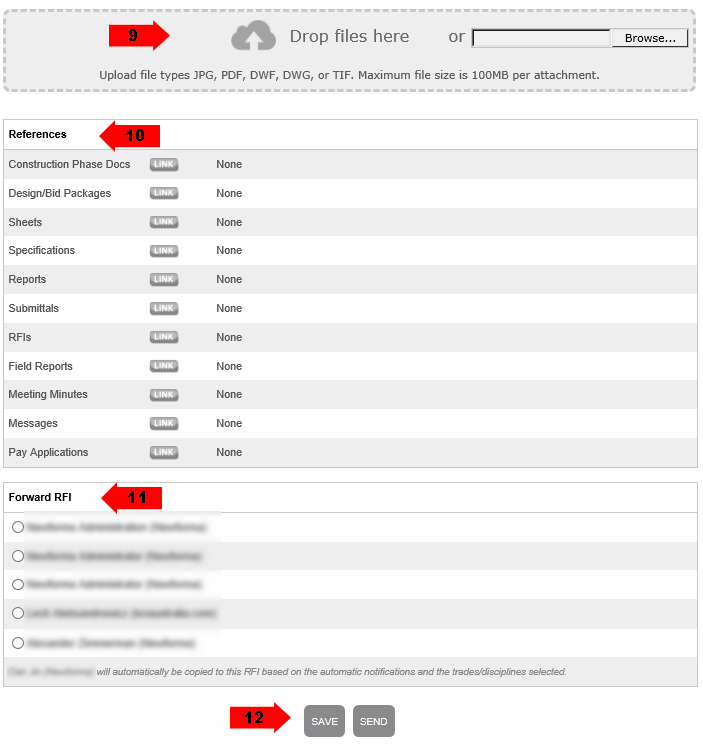
Drag and drop PDF(s) of the RFI documentation to the Drop Files Here section of the page to upload them. Alternately, you can select Browse to browse for the files. Some older browsers do not support drag and drop. If configured, the system automatically adds the project’s cover sheet to the upload. If the system detects a match in the Sheet or Specification Index, you are prompted to confirm or dismiss the match.
In Chrome, Browse is replaced by Choose File.
Cross reference any related ConstructEx items as needed.
Select the RFI recipient in the Forward RFI section. Subcontractors are prompted to send the submittal to a member of the contractor team. Contractors are prompted to send the submittal to a member of the design team.
Select Save if you want to mark up any uploaded documents before sending the RFI or if you want to continue working on the RFI at a later time. Select Send if you are ready to send the RFI. Once you send the RFI, the selected user is notified of the RFI and it is now their responsibility to act on it as needed.

To add markups to an uploaded document, select Add Markups to the right of the document in the Existing Attachments section of the View RFI page. The first page of the document is the project cover sheet, if applicable. Because it is a web-based tool, please remember to save your markups often. To view a brief video tutorial on using the markup tools, click here.
To simply view the document, select the document name.
After saving your markups, select Forward at the bottom of the page. Continue with steps 11and 12 above to select the recipient and send the RFI.
If this page is blank, clear your help filter to view topic content.
