Design Team Leaders: Initiate, Edit and Close a QC Item Quick Reference Guide
Design Team Leaders: Initiate, Edit, and Close a QC Item Quick Reference Guide
Design team leaders, including architects and engineers, may enter, initiate, and close quality control (QC) items in order to document and correct construction defects. Design team leaders typically use the Plans mobile app on the job site to enter and upload QC items to the Newforma ConstructEx web-based platform. Follow the steps below to initiate, edit, and close QC items in ConstructEx.
Click here to download a PDF of the reference guide.
Arrive at the Quality Control (QC) Module
Log into ConstructEx to access the All Projects page.
The first time you log in you will be prompted to complete your profile information. Once your profile is complete you are directed to the All Projects page.
Select the desired project by clicking the project name.
Expand the Field Management dropdown menu at the top of the page and select Quality Control to open the Quality Control module: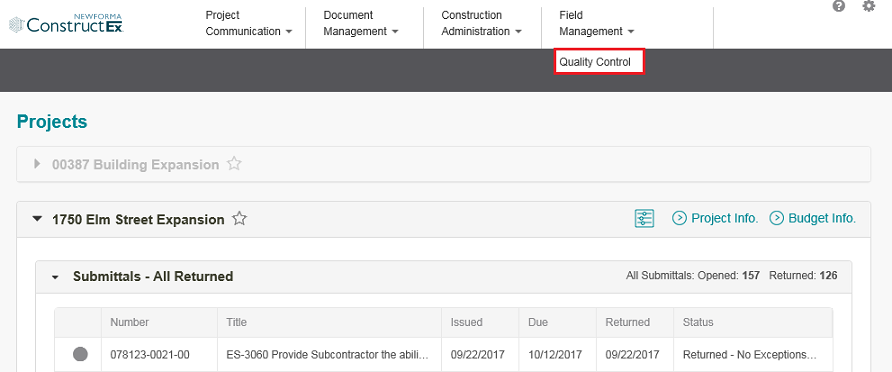
Create a QC Punch List Item
In the Quality Control module, select Add Item to display the Add Quality Control Item page.
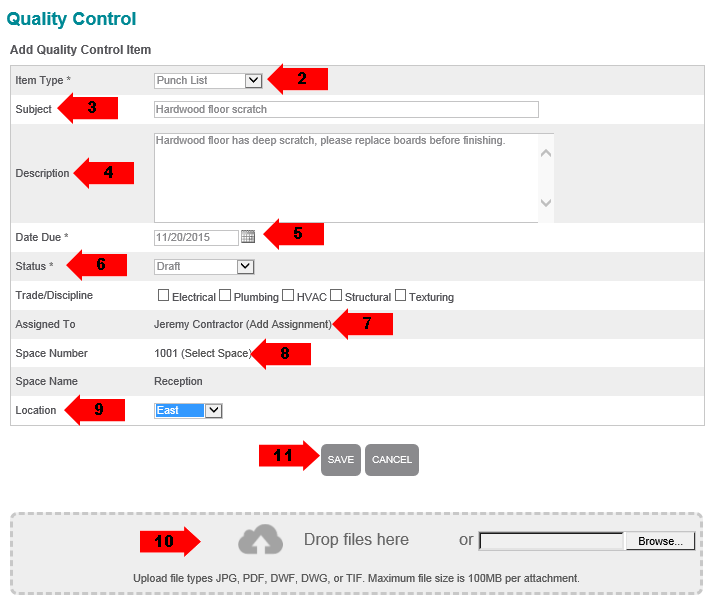
Select an Item Type to match the quality issue.
Enter a Subject. In our example, the design member in the field identifies a flooring defect.
Describe the QC issue.
Select a due date to indicate when the defect must be corrected.
Select a Status. For example:
Draft. If you are not ready to release the QC item, select Draft. Perhaps a manager needs to verify the defect. Draft items are visible to the originator, other users from their company and any users assigned to the item.
Open or Assigned. Select Open or Assigned if you want the item to be visible to the entire team immediately.
Select Add Assignment and select a person to assign the defect to if desired.
Select the Space Number where the defect is located. If the spaces do not exist, you can add them manually via the Document Management > Spatial Index module. You can also contact your administrator to import the spaces.
Select the defect Location. If the location is not available, you can add it by selecting Module Configuration under Administration in the right panel of the module. If you do not see the Administration section, contact your administrator to add the locations.
Drag and drop attachments, such as a picture of the defect, to the Drop Files Here section of the page to upload them. Alternately, you can select Browse to browse for the files. Some older browsers do not support drag and drop.
In Chrome, Browse is replaced by Choose File.
Select Save. At this point, the responsibility for the item is passed from the user in the field to the assigned user, who is notified that the QC item is assigned to them.
Modify a Punch List Item
In the Quality Control module, select a log from the right panel to view a list of QC items.
Select the QC item you want to view to open the View Quality Control Item page.
Select Edit to open the Edit Quality Control Item page.
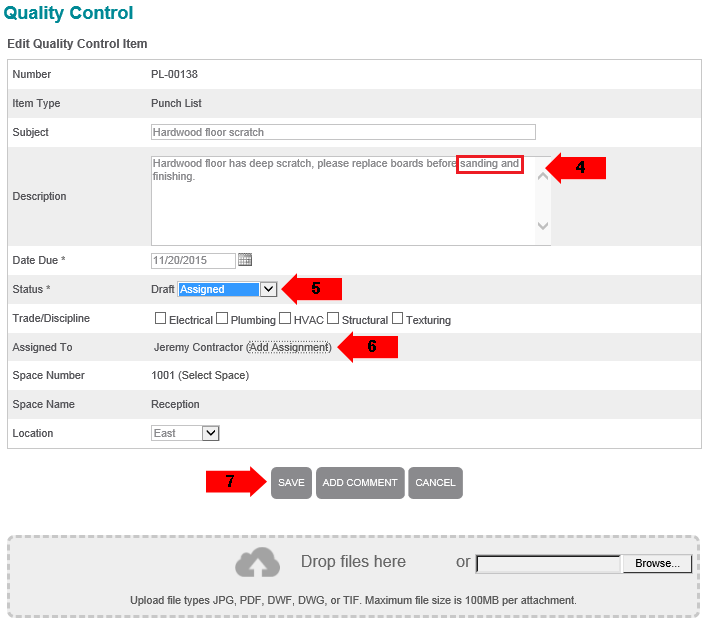
Edit the Description. In our example, the design team member assigned to the QC item updates the wording of the description.
Change the Status from Draft to Assigned.
Select Add Assignments and select a contractor in the Select Assignment dialog box.
Select Save to save the changes. At this point, the responsibility for the QC item is passed from the design team to the contractor, who is notified that the QC item is assigned to them.
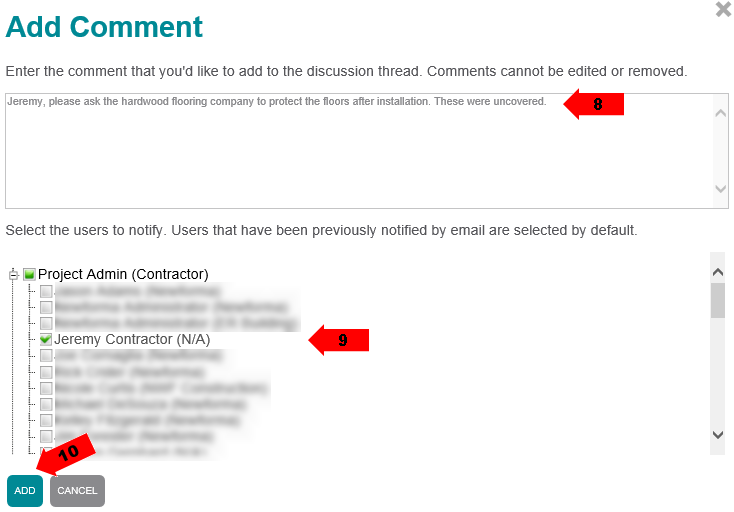
Select Add Comment on the View Quality Control Item page or on the Edit Quality Control Item page to add additional information.
Select the team member(s) you want to receive the comment.
Select Add to add the comment and notify the selected user(s).
At this point, the contractor can sign in and begin the correction process for the QC item. When the correction is made, the design team leader can verify the fix.
Close the QC Item
The design team leader can close the QC item.
In the Quality Control module, select a log from the right panel to view a list of QC items.
Select the QC item you want to view to open the View Quality Control Item page.
Scroll down an review the comments in the Discussion Thread section to verify the fix is complete. In our example, the design lead verified the fix in the field to ensure the correction was made properly.
Select Add Comment to enter a comment indicating you accept the fix.
Select Edit on the View Quality Control Item page.
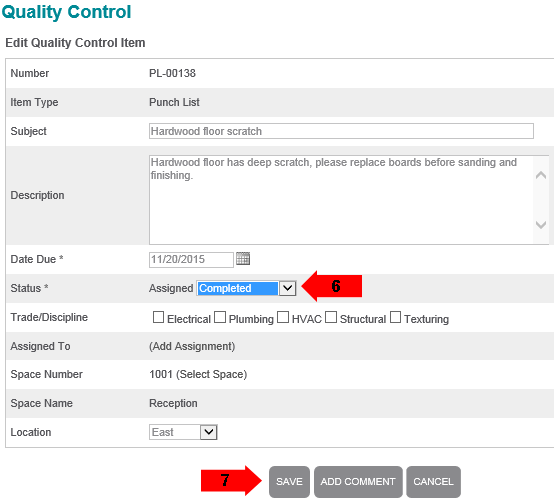
Set the Status to Completed.
Select Save to save your changes.
If this page is blank, clear your help filter to view topic content.
