
Use the Newforma Project Cloud Viewer
Use the Newforma ConstructEx Viewer
Use the Newforma ConstructEx Viewer to mark up files attached to project items such as submittals and RFIs. You can launch the viewer by selecting Add Markups for an attached PDF, JPG or TIF file.
Contractor and subcontractor users must first upload the file and save the submittal/RFI as a draft before adding markups to the file.
For an explanation of all of the markup tools included in the Newforma ConstructEx Viewer, please see the Newforma ConstructEx Viewer Overview.
To view a brief introductory video, please see the Using the Markup Tools video.
If you are using the mobile version of the viewer, press and hold to launch the popup menu.
Click on a topic in the list to view it:
Add an Electronic Submittal Stamp
Automatically Flatten Markups into Submittals/RFIs
Can Users Mark Up Files Concurrently?
Copy and Paste Markups to Multiple Pages
Delete/Edit Markups and Stamps
Navigate a Drawing using the Toolbar
Rotate Document in Markup Tools
Search for Text in the Markup Document
View Thumbnails for a Multipage Document
To add an image to a markup
You can insert JPG, PNG, GIF and TIF files as images.
Select ![]() in the viewer toolbar. Select Browse/Choose File in the Select an Image dialog box to browse to the desired image, then click OK.
in the viewer toolbar. Select Browse/Choose File in the Select an Image dialog box to browse to the desired image, then click OK.
The image is added to the document. Click and drag to position and resize the image as needed.
One the image is added it can only be moved, edited or deleted by its author. You can view the author’s name by hovering your mouse over top of the image.
Click the Save Markups icon once you have added your image and comments.
To add an electronic submittal stamp
You can insert JPG, PNG, GIF and TIF files as submittal stamps.
Select ![]() in the viewer toolbar. Select Browse/Choose File in the Select an Image dialog box to browse to the desired stamp image, then click OK.
in the viewer toolbar. Select Browse/Choose File in the Select an Image dialog box to browse to the desired stamp image, then click OK.
The stamp is added to the document. Click and drag to position and resize the stamp as needed.
Once the stamp is added it can only be moved, edited or deleted by its author. You can view the author’s name by hovering your mouse over the stamp.
Click the Save Markups icon once you have added your stamp and comments.
To add callouts and leaders
Select ![]() in the viewer toolbar.
in the viewer toolbar.
Click on the item you want the arrow to point to (the arrow is placed first) and then drag and drop the callout to the desired location.
The Text Markup dialog box appears. Enter the callout text and click OK when finished to add it to the markup.
To add another leader, right click on the callout and select Add Leader from the popup menu. Drag and drop the arrow to the desired location. You can also create an arrow using the Arrow tool and place its endpoint in the callout box.
Clicking the minus sign on the leader removes it.
To add a signature to a stamp
There are several ways to add your signature to your stamp.
If you want your true signature to display, we recommend incorporating it with the original stamp image (JPG or PNG) uploaded to the markup tools. Click here for uploading stamps.
If you don’t require your true signature you can use the text tool and apply it over the stamp image.
You can include the signature with the automated stamp sheet if your project is utilizing that feature.
You can use the markup tools to add a signature by saving it as a raster image. Click here for adding raster images.
Can users mark up files concurrently?
Multiple users can concurrently mark up a file. There may be cases where two users add a markup or a stamp in the exact same location during a concurrent review session. This does not happen often, but if it does one of the users must move their markup or stamp so they do not overlap. Keep in mind that users cannot move other users’ markups or stamps.
To copy and paste markups to multiple pages
Perform the following steps to quickly copy and paste markups to multiple pages using the markup tools.
Choose the Edit/Select tool ![]() in the viewer toolbar and stretch a box around the items you want to copy.
in the viewer toolbar and stretch a box around the items you want to copy.
Once the objects are selected, right click and select Copy from the popup menu or press Ctrl+C to copy the objects.
Go to the next pages, right click and select Paste from the popup menu or press Ctrl+V to paste the objects. Left click and drag to place the objects.
You can copy and paste markups between pages of a multipage document. You cannot copy them between documents.
To copy text from the document
Perform the following steps to select and copy text contained in the markup document.
Select ![]() in the viewer toolbar. Click and drag over the text you want to copy.
in the viewer toolbar. Click and drag over the text you want to copy.
Right click and select Copy from the popup menu or press Ctrl+C to copy the text. The text is copied to the Windows clipboard.
To delete or edit markups and stamps
Perform the following steps to delete or edit markups and stamps.
You must be the author of the markup or stamp to edit or delete it.
Choose the Edit/Select tool ![]() in the viewer toolbar and click on the markup you want to edit or delete.
in the viewer toolbar and click on the markup you want to edit or delete.
To select multiple markups, click and drag to draw a box around them or hold down the Ctrl key as you click on the items.
To delete a markup, press Delete on the keyboard. You can also delete the markup by right-clicking and selecting Delete from the popup menu.
To edit a markup’s properties, right click and select Style from the popup menu to open the Tool Style dialog box.
To edit a markup object’s properties
Use the Tool Style dialog box to set and modify markup properties.
To change the properties of an existing markup, select the markup before opening the Tool Style dialog box.
Select ![]() in the viewer toolbar to open the Tool Style dialog box.
in the viewer toolbar to open the Tool Style dialog box.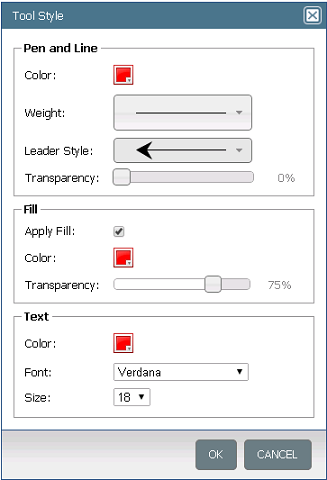
Change any properties as needed. Click OK to save your changes.
For details on the property settings, please see Tool Style dialog box.
To export markups to PDF
Perform the following steps to export the marked up document to PDF.
Select ![]() from the viewer toolbar. The viewer exports a PDF of the document including the markups.
from the viewer toolbar. The viewer exports a PDF of the document including the markups.
Depending on your browser, you may be prompted to open or save the document before the export completes.
The viewer toolbar provides several options for navigating the document:
![]() Zoom Rectangle. Use this tool to select a rectangular area to zoom in on.
Zoom Rectangle. Use this tool to select a rectangular area to zoom in on.
![]() Zoom to Full Page. Use this tool to fit the entire document in the viewing area.
Zoom to Full Page. Use this tool to fit the entire document in the viewing area.
![]() Pan. Use this tool to move the drawing around the viewing area. Pan is automatically selected after you zoom in on an area.
Pan. Use this tool to move the drawing around the viewing area. Pan is automatically selected after you zoom in on an area.
Previous/Next page. When working with multipage documents, previous and next page icons appear in the viewer toolbar.
To rotate a document in the markup tools
Use one of the following options to rotate the document in the viewer:
![]() Rotates the document 90 degrees counter clockwise.
Rotates the document 90 degrees counter clockwise.
![]() Rotates the document 90 degrees clockwise.
Rotates the document 90 degrees clockwise.
To search for text in the markup document
Select ![]() from the viewer toolbar to open the search bar.
from the viewer toolbar to open the search bar.
Enter the text you want to find in the search field and click Search.
The first instance of the text is highlighted in the document.
To find additional instances of the text, click the Next Result button in the search bar.
To view thumbnails for a multipage document
Select ![]() from the left navigation panel in the viewer to expand the thumbnails panel, shown here:
from the left navigation panel in the viewer to expand the thumbnails panel, shown here:
A cloud icon next to a page’s thumbnail indicates that the page includes markups. Select the cloud icon to jump to the page and automatically highlight all the markups on that page, making them easily visible.
Select a thumbnail to view the page. Select ![]() to collapse the thumbnails panel.
to collapse the thumbnails panel.