
Create a Custom Log
Create a Custom Log
Perform the following steps to create a custom log to view log items based on custom search criteria.
For specific information on creating a custom submittal log that includes expected and received submittals, please see Include Submittal Register Items in a Custom Log.
To create a custom log
Under Logs in the right navigation panel, select Create a Custom Log.
If you are creating a log for submittals or RFIs, select a Log Format:
Status Log: Provides basic status information on items. Includes columns for status icon, Number, Title, Issued, Due, Returned, and Status.
Review Log: Focuses on who is currently responsible for working on an item and how much time remains until the item is due. Includes columns for status icon, Number, Title, Due In, and Pending Review By.
Submittal Register Log: Includes information on both expected and received submittals, similar to the content of the All+Expected log. Creating a custom log allows you to further refine the information shown. For example, you could create a log that shows all existing and expected submittals for a specific subcontractor, trade or discipline.
On the Create Custom Log page, select the criteria you want to apply to all items in the log. This can include Status, Submittal Type, Associated Users, Dates, Trade/Discipline, Substitutions, etc.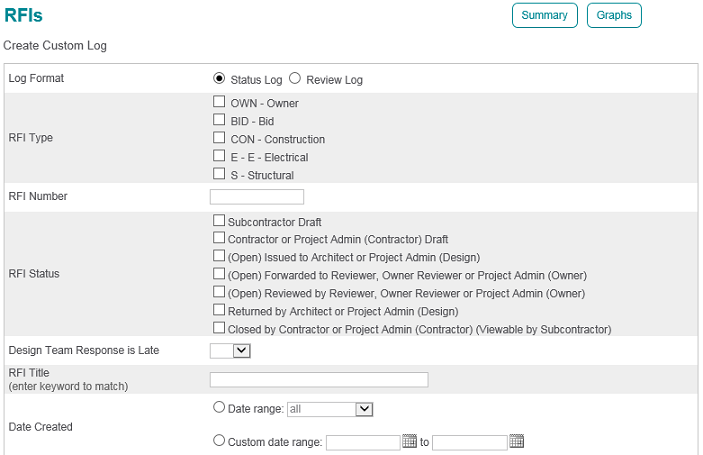
If you want to search for a group of values, such as all submittals in a certain division, you can use the asterisk (*) to indicate any value. For example, if you want to see all submittals under division 15 enter 15* in the Spec Section field when creating the custom log.
In the Save Custom Log section at the bottom of the screen, give the custom log a Display Name based on the search criteria. For example, if you selected the Open status, the Late tag and the Structural discipline, you might name it Open Late Structural.
Enter a description if desired.
Administrative users may share the log with other users on the project by selecting the Project-wide Log check box. To share the log with specific users, click the Edit Permission Access link and select the users you want to be able to view the log.
Select Save as Custom Log. The log now appears in the Log list in the right navigation panel.