Create Cover Sheets Quick Reference Guide
Create Cover Sheets Quick Reference Guide
Cover sheets can be used within the Newforma ConstructEx system to display data for accompanying submittals, RFIs, and construction phase packages. You can either use a Newforma cover sheet template to which you can add your logos and stamps, or you can create a custom cover sheet in your traditional format. We encourage users to use the Newforma templates as a base, as their language directly correlates to the language and information in the software.
Click here to download a PDF of the reference guide.
This guide takes you through the following steps in creating cover sheets:
Choose the right cover sheet template
Add stamps to a submittal cover sheet
Populate information fields on a cover sheet
Upload your cover sheet to ConstructEx
Select and Prepare your Editing Tool
You can edit cover sheets with any PDF editor that allows you to add images and includes form field editing capabilities. Adobe Acrobat Pro DC is used for the screen shots included in this document.
Prior to starting, ensure that the Prepare Form and Edit PDF tools are available.
Choose the Right Cover Sheet Template
Standard ConstructEx cover sheet templates can be downloaded from the Help site in the following location:
http://help.newforma.com/Newforma_Project_Cloud/desktop/Overviews/Sample_Cover_Sheet_Documents.htm
Following is a description of each of the cover sheet templates.
Submittal Cover One Page Without Design Team Review
This cover sheet can be used when:
No stamps are desired
Only the contractor stamp is desired
The design team prefers not to use the integrated markup tools
This cover sheet should not be set to update upon return to the contractor, as none of the information will change after it is submitted.
Submittal Cover One Page With Design Team Review
This cover sheet can be used when:
No stamps are desired
Only the design team’s stamp is desired
Both a contractor and a design team’s stamps are used
This cover sheet has additional fields that populate with information from the design team, so it should be set to update upon return.
To see a template that includes example stamps with form fields included, see Submittal Cover – One Page with Sample Stamps and Design Team Review.pdf
Submittal Cover Two Page With Design Team Review
This cover sheet is the same as the Submittal Cover One Page With Design Team Review, but has a second page added for Review Comments and References. The Review Comments field populates with all comments entered by all members of the team and notes which team member added the comment.
RFI Cover
Most project teams choose to use the Print Summary option in the software to create their RFI synopsis sheets. If this is not desired, the standard two-page RFI cover sheet template can be used.
Construction Phase Document Package Covers
The two construction phase cover sheets are identical with the exception of the Adjustments section. If your construction phase document package includes adjustments and you want that information on the cover, use the Adjustments cover.
Add Logos to a Cover Sheet
When adding logos to the cover, it is best to use an original logo file if available. It will retain better resolution than the 233×78.png company logo files referenced in the Create Company and Project Logos Quick Reference Guide and video.
Open the standard cover sheet template in the PDF editor.
Select the Edit PDF tool from the Tools sidebar.
Click Add Image in the Edit PDF toolbar. Navigate to the location of your digital logo file.
Once the file is open, click and drag to place and size the logo.
Repeat the process to insert any additional logos as needed. Make sure logo files do not overlap and are roughly the same size.
Add Stamps to a Submittal Cover Sheet
If you are not working on a submittal cover sheet, proceed to the next section: Populate Information Fields on a Cover Sheet.
A contractor’s stamp and a design team’s stamp can be added to a submittal cover sheet. Other stamps can be added, but it is important to note that the submittal cover sheet is applied to all submittals for a project. In most cases, it is not appropriate to have additional stamps on the cover sheet.
Use Add Image to select the desired stamp file or files. Drag and drop the contractor stamp to the left side of the sheet. If you are also adding the design team stamp, drag and drop it on the right side of the sheet. Align the stamps to look good on the page: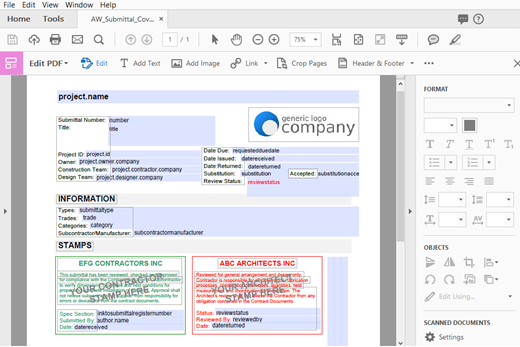
Note that if a stamp is in a PDF file format, it cannot be uploaded directly to Adobe Acrobat Pro DC. You will need to take a screenshot of the PDF in order to import it:
a. Open the stamp PDF in Adobe Reader.
b. A screen snapshot works best if you enlarge your screen view to at least 150% to capture a good screen resolution of the stamp.
c. On the dropdown menu, select Edit > Take a Snapshot.
d. Select as close as you can around the edge of the stamp to capture just the stamp image.
e. Go back to Adobe Acrobat Pro DC and press CTRL+V to paste the stamp image onto the cover sheet.
f. Resize the image as needed using the blue squares, shown below. Click and drag the stamp to the desired location.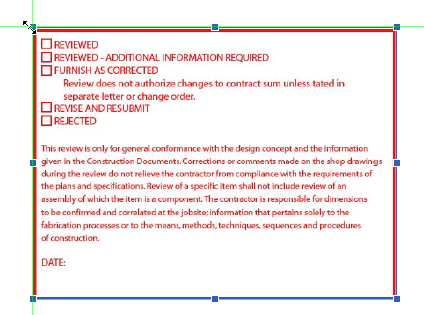
Populate Information Fields on a Cover Sheet
You can map information on the cover sheet to automatically populate with ConstructEx document information using form fields. Use Adobe Acrobat Pro DC to either create a new form field text box or copy an existing field as shown below.
Note that a list of valid form fields is included in Appendix A.
To create a new form field
Select Prepare Form in the Tools sidebar.
Click the Add a Text Field icon in the Prepare Form toolbar:
Place the field in the correct position and adjust the size and shape as needed.
Enter the appropriate Field Name by copying the text exactly as it appears in Appendix A: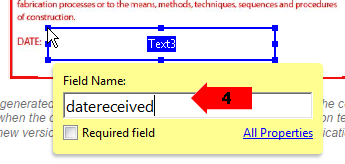
Select the All Properties link, then format the text as desired on the Appearance tab in the Text Field Properties dialog box.
To copy an existing form field
Select Prepare Form in the Tools sidebar. Existing fields are listed: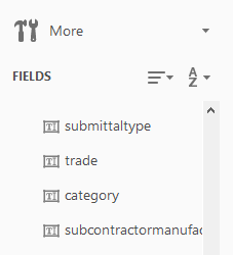
Select the existing field you want to copy either by selecting the field from the Fields list or by selecting the field directly on the form.
Press CTRL+C to copy the field.
Press CTRL+V to paste the field onto the form. Click and drag it to the desired location.
Double-click on the field to edit it.
On the General tab, enter the appropriate field Name by copying the text exactly as it appears in Appendix A.
Format the text as desired on the Appearance tab.
Note that the form field size is fixed. Fields will not expand or carry over to additional pages. If the text entered in a field in ConstructEx exceeds the available space on the cover sheet, the full text will not appear on the cover sheet. The full text will always be available on the ConstructEx site. You can increase the size of the field on the cover sheet template if needed.
Upload Your Cover Sheet to ConstructEx
Once your cover sheet is complete, you can upload it. Each type of cover sheet is uploaded to its own location in the software.
To upload submittal cover sheets
Submittal cover sheets are uploaded via the Submittal Module Configuration screen’s Submittal Cover Sheet section:
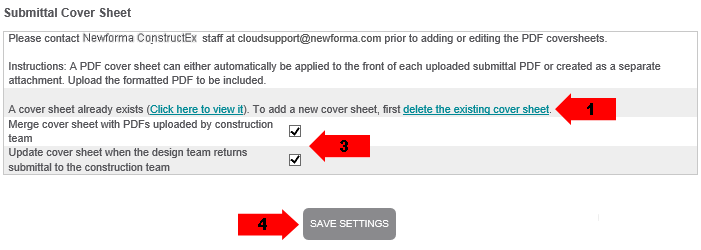
Select Delete the Existing Cover Sheet to remove the existing cover sheet.
Select Choose File to navigate to and select the cover sheet file to upload.
Read the options for cover sheet behavior and select the appropriate checkboxes. For example, if the cover sheet includes an architect review field, select the Update Cover Sheet When the Design Team Returns Submittal to the Construction Team option.
Select Save Settings at the bottom of the Submittal Cover Sheet section to save your changes.
To upload RFI cover sheets
RFI cover sheets are uploaded via the RFI Module Configuration screen’s RFI Cover Sheet section. The process is similar to uploading submittal cover sheets.
Select Delete the Existing Cover Sheet to remove the existing cover sheet.
Select Choose File to navigate to and select the cover sheet file to upload.
Read the options for cover sheet behavior and select the appropriate checkboxes. Most teams do not elect to merge the RFI cover. If the Answer field is used on the cover, select the Update Cover Sheet When the Design Team Returns RFI to the Construction Team option.
Select Save Settings at the bottom of the RFI Cover Sheet section to save your changes.
To upload construction phase document package cover sheets
Construction phase document package cover sheets are uploaded via the Construction Phase Documents Module Configuration screen’s Document Types section:
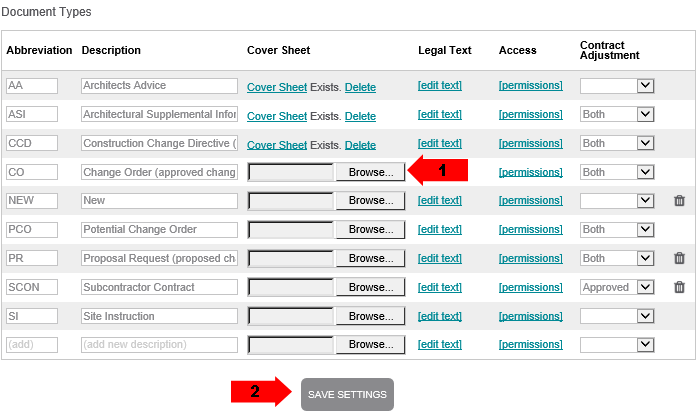
For each document type, select Browse in the Cover Sheet field to navigate to and select the cover sheet file to upload.
In Chrome, Browse is replaced by Choose File.
Select Save Settings at the bottom of the Document Types section to save your changes.
Create a Custom Cover Sheet
While we encourage using the ConstructEx Cover Sheet templates because the language correlates directly with the language used in the software, custom covers can be created. A custom cover sheet can be used for any cover type in ConstructEx.
One challenge with creating custom cover sheets is that the information on the cover sheet has to be replicated using only the information available in the software. Before you create a custom cover sheet, consider the following items:
Only items from Appendix A can be used as form fields on custom covers.
Not all information can be auto-populated with form fields. Some must be manually filled out by users with the ConstructEx markup tools.
As a best practice, we recommend deleting cover sheet fields that cannot be auto-populated, unless they are highly important. Each field that must be manually marked up costs the team time.
To create a custom cover sheet
Start with a PDF file of the cover sheet you want to recreate as a base file.
It is best to use a clean blank cover sheet document as a base file.
If exporting the cover sample to a PDF file from another program, be sure to print it as a PDF instead of saving as a PDF. This avoids future formatting complications in the software.
Once you have your base PDF file, open it in Adobe Acrobat Standard.
Follow the directions to Populate Information Fields on a Cover Sheet.
Cover Sheet Troubleshooting
If a project has existing submittals and the cover sheet is set to update upon return, we recommend that all submittals are closed before uploading a new cover sheet. If a user marked up a cover sheet and it is swapped out upon return, it may change the intent of their notations.
If a project has existing submittals, is set to update upon return and has a single page cover sheet, we recommend that you do not replace the single page cover sheet with a multipage cover sheet. Again, we recommend closing out all existing submittals before uploading a new cover sheet. If items are not closed out and they are marked up, the markups will be shifted and will appear on the wrong page.
If a cover sheet is removed from the system and re-uploaded during the review process, the fields are no longer mapped and will not update. An example of this behavior is if a consultant downloads a submittal, marks it up and re-uploads it – the mapped field on their attachment will not update.
Note that construction phase document package cover sheets do not update. They are created when the item is first issued and do not change thereafter.
Occasionally, cover sheets are not added to PDFs. Please see the Help article Cover/Stamp Sheet is not Adding to PDF for more information.
Appendix A
General Fields (Available for all cover sheet types)
Project
|
project.id
project.name
project.address.addressline1
project.address.addressline2
project.address.town |
project.address.region
project.address.postalcode
project.owner.company
project.contractor.company
project.designer.company |
Author
|
author.name
author.company |
author.email
author.phone |
Submittal Specific Fields
|
number
title
status
copies
datereceived
datereturned
dateclosed
submittaltype
requestedduedate
trade
category
substitution
substitutionaccepted |
transmittalnumber
internalarchivingnumber
submittalnotes
reviewstatus
reviewcomments
reviewedby
linktosubmittalregister
linktosubmittalregisternumber
linktosubmittalregistertitle
subcontractormanufacturer
daysrequestedforreview
references
contractortransmittalnumber |
RFI Specific Fields
|
number
title
subcontractornumber
datedue
datesubmitted
datereturned
datedueconsultant
question |
suggestion
trade
category
subcontractormanufacturer
costimpact
divisionnumber
reviewcomments
references |
Construction Phase Document Package Specific Fields
|
number
title
dateissued
trade
category
description |
sumadjustmentsubmitted
sumadjustmentaccepted
timeadjustmentsubmitted
timeadjustmentaccepted
references |
If this page is blank, clear your help filter to view topic content.
